Sunday, January 20, 2013

Building an Early Lacote Guitar

My working drawing of Lacote 1823
I started on a model of the 1823 Lacote in August  2011 as an extra project. Several of my early blog posts, September 10 and 19, 2011 included descriptions of the progress I was making. But then my spare time ran out and the guitar was put aside.


Back then, I had gotten as far as assembling the the side ribs, the front and rear blocks, the linings for the ribs and gluing on the back. When I started to work on the guitar again a few months ago I prepared the harmonic bars for the soundboard. In the 9/10/2011 post I described heat bending the bars for the back and the reason for doing so. I followed the same procedure for the soundboard bars but only the two for the lower bout were bent. The two above the rosette are flat. These were then glued securely into slots the lining.

I like to use Italian spruce for the the soundboards of my 19th century guitars. It is light weight but resilient so I can use a thicker top (3mm) that gives a woodier tone without sacrificing speed of response or decay. You'll notice that I use a maple bridge plate. The material is left over from the rib stock and, like the rib thickness, is 1.2mm thick. I taper it from the peak along the horizontal axis to nothing at the edges. Few original early guitars were fitted with bridge plates it seems, but they were often added in the guitars' later life.  I find that adding them increases the guitar's power. They also protect the underside of the soundboard from the eroding effect of the balled-up ends of the strings -- old guitars are really crewed up under the bridge.


I like the idea of stretching the soundboard over the assembled bars and side ribs and gluing it in place in as a single procedure. The usual method gluing bars to the belly and then fitting the bar ends to the side ribs involves a lot of trial and error that can lead to compromises and distortions. I think that the equilibrium that is achieved with the stretch method is beneficial for tone production.

Clamping is initially done with painter's tape,  then foam lined curved or flat cauls and an assortment of other clamps are added. I use a slow setting fish glue that allows  time for assembly.
My method for fitting the neck to the body is with a simple v-joint. I had rough cut the recess into the front block before I glued the back in place and trued the surfaces after the back was glued on. Once the belly was in place I could make the neck. I cut a piece of flat
sawn maple and laid out the contours. The peghead is fitted with a long v-joint and the heel is a separate block that sits on a sloped surface that increases the length of the gluing surface. In the photo I have already made  the initial cuts for the peghead joint. Fitting this joint is difficult and time-consuming so it is important to make these cuts accurately.

Many original Lacote guitars were fitted with rear mounted tuning machines designed by Lacote. The photo to the left is of one of my earlier Lacote models with Rogers' Lacote style tuners.


Guitars often are the victims of carelessness and as a consequence pegheads are broken. If the damage is serious enough the peghead is discarded  and a new one grafted on. That undoubtedly was the fate of my model (right). I thought this was an interesting incident in the guitar's history and I decided to model it.


I prepared a block of maple for the peghead, cut the corresponding v-joint and veneered face and back with 1.2mm ebony plates. I laid out the and drilled the holes for the tuning machines' string rollers. In the photo I am drilling out the waste portion of the string slots. Then I'll true the edges with chisels and sanding blocks.
 Once the peghead is glued to the neck stock I shape the neck with rasps, course files and contoured sanding blocks with the aid of templates made from the original 1823 Lacote.

The transitional area between the peghead and the v-joint is finished by using the back of a chisel as a scraper.


Next time I'll describe making and installing the banding, assembling the rosette, fretting and embedding the metal belly frets, making the bridge and varnishing.


Monday, January 7, 2013

An 1823 Lacôte and My Copy


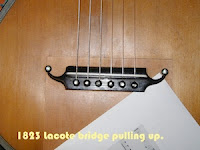
Several years ago Brooklyn guitarist Pat Bianculli arranged for me to look at a persistent problem that plagued his 1823 Lacôte. At some time previous to his purchase of the guitar, the area around the bridge had been so badly damaged that it was necessary to graft a new piece of spruce to the soundboard. Unfortunately, the wing on the treble side of the bridge lifted from the soundboard and defied repeated attempts to re-glue it.


Pasquale Bianculli photo
When I inspected the guitar I found that a trough, a depression, had formed in the soundboard under the affected part of the bridge. Looking inside the guitar I found that thin strips of spruce had been glued over the three joints of the graft as re-inforcement. The depression ran parallel with the wood grain from the lateral re-inforcement strip at the top of the bridge under the wing of the bridge and continued for several centimeters. This coincided with an area just inside the right re-inforcement strip. I speculated that the restorer had purposefully over-dried the spruce graft prior to inserting it but errored by making it too dry. Once installed and bound by the re-inforcement strips the graft could only reach equilibrium by cupping. Since the trough, the cup, was essentially built into the soundboard any attempts to force the bridge into contact with the soundboard by normal means, such as clamping, were doomed.
As a starting point I removed the bridge and was mildly surprised to see that some of the tension in the soundboard was relieved as the cupping eased slightly. Encouraged, I decided to employ a technique used in lute repair. When bellies are made too thin the area behind the bridge distorts around the one or more of the diagonal fingers bars causing the bridge to lift. Removing the belly and flattening it is one solution, but an extreme one. Removing the bridge and shaping its bottom to fit the wavy contour of the belly is less invasive than separating the belly from the bowl, or the soundboard graft from the guitar, and flattening it.

Since the small troublesome cup was a permanent feature I decided to incorporate it into the fix. I made a thin maple bridge plate, carefully contoured to the underside of the soundboard including allowance for the cupped area and glued it in place using the bridge pin holes as a reference. Then followed the technique of shaping the under-side of the bridge and gluing it in place using the same procedure. Sometime after getting his guitar back Pat wrote and said:"My Lacote continues to play well. The repair you did was spot on and it is sounding wonderful."

While I had the guitar in my shop I took photos and made a working drawing. I have made a handfull of Lacote guitars over the last 10 or 12 years and examined several others in museums so I thought I might make a copy of this one. I was especially attracted to it because it retained its original neck, soundboard frets and low bridge, although neither the bridge nor the peghead are original. I viewed all of this an an exciting possibility and looked forward to having the spare time to build a model.

Which I have done and I am nearly finished! My next post will describe its construction.

All photos by the author except as noted.